Friday, March 25, 2016

You're So Special To Me!

I am not good with watercolour.  I guess it is because I learnt oil painting first when I was a teen.  When I picked up acrylic and oil pastel later on, they come natural to me because they are very similar media in terms of how you can move the pigments around the way you want them.  Colour pencil is a little different in terms of how colours are layered when compared to the other three media but still you have full control of it.  Watercolour was the last medium I tried and it is so different.  I was intimidated by it and didn't do much with it not till recently.  I sincerely thank Coco Bee Art, Life In Watercolor for this.  It is a mind opening experience for me!   I strongly encourage you to check out this YouTube vedio if you haven't yet :)


I used Sennelier watercolour for this card, i.e. the background and all the images, but you can use any watercolour you like.  The images are from Clearly Besotted - Woodland Kisses.  The sentiment is from Hero Arts - Year Round Sentiments stamp set.  I stamped it with memento inks and the help from my Misti.  The rain drop is done using uni-ball white gel pen.  The edges of the card are distressed using the same memento inks.  The purple "halo" effect was done using a blending tool on wetted distress crayon (seedless preserves).  All the materials used on this card are listed below!


Thank you for dropping by, have a fantastic and creative day!

Sunday, March 20, 2016

Kitties In Box - Just For You


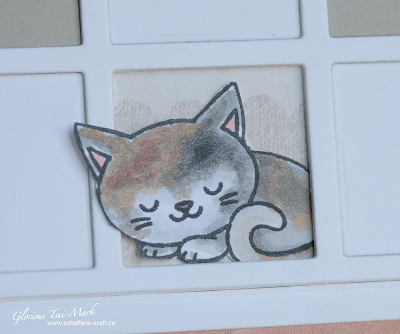
As promised, here is my last card using the same Clearly Besotted You're Purrfect stamp set!  However, I didn't use the rest of the cats...my daughter claimed one for her own use!

The cats were coloured with Copic Markers.  The white panel and the box are die cut using Mama Elephant's All Prettied Up die set.  The pinkish part of the box is a scrap I saved from the Easter bunny card (I put the white felt bunny on top of a white card stock and sprayed them with Heidi's color shine, I just used the sprayed part of the card stock to die cut the box).  The flap of the box is just a piece of craft paper from my daughter's stash.  I used uni-posca to add the yellow polka dot on the flap.  The sentiment is from Stampendous HOPPY MOMENTS House Mouse Stamp set


Thank you for dropping by, have a fantastic and creative day!

Hope You're Feline Better Soon!


Clearly Besotted's You're Purrfect stamp set has so many cute kitties.  I decided to made another card with them.  

The background, i.e. the wall and the carpet are patterned paper from Recollections.  

The "shelf" was made using Mama Elephant's Peek A Frame die set.  I used the window die for the front of the shelf and made the top and the bottom myself to make the shelf look a little more realistic.  

I die cut the window frame with 110 lb white card stock three times and glue the frames on top of each other to get the dimension I want.  I then die cut the window frame one more time with light grey card stock to get a second colour for the doors of the self.   

All the lovely kitties, cushion, yarns and fish bone were coloured with Copic Marker!

I still have three cats I haven't used from this stamp set and will properly be making one cute and cuddly card with them!


Thanks for dropping by, have a wonderful and creative day!

Saturday, March 19, 2016

Big Birthday Wishes To U


This card is for Simon Says Stamp's Cute And Cuddly Challenge.  The cat and the fish bowl on this card are from Clearly Besotted You're Perfect stamp set!   The sentiment is from Simon Says Stamp Big You Words stamp set.  The sentiment was stamped using Hero Art Black ink on American Craft white card stock.  The U was stamped with the same ink on a separate white card stock and then fussy cut out for the cat.  Both the cat and the fish bowl were coloured with Copic markers and were then fussy cut out.  Lawn Fawn Speech Bubble Border was used to die cut the white panel.


The polka dot on the aqua colour card stock was done using white uni-posca acrylic pen.

Sunday, March 13, 2016

Thank You In Green


Love this challenge...cause otherwise I wouldn't have created a card that is so green!   Not that I don't like green, is just that I love colours and I always want to use many of them on a card!  This monochromatic card turned out to be a super fun card to make!  

I used Studio L2E's Hi-Light It: Drops stamp set and Memento's Dew Drop inks to stamp the pattern.  The sentiment is from Stampendous's Happy Messages Perfectly Clear Stamp Set.  The scalloped stitched border is from Lawn Fawn. 

Memento Ink: Dandelion, New Sprout, Pear Tart, Bamboo Leaves

I started stamping with the biggest outlined polkadot drop shape stamp at the top right corner with the New Sprout colour.  Then the smallest solid drop shape stamp with Dandelion Ink, repeat the stamping on the solid shape with the matching solid polkadot stamp and New Sprout ink.  

The second row was done using the second smallest solid drop shape stamp with the New Sprout ink and the matching stripe stamp with Pear Tart Ink.  

The third row used the one size up solid drop shape stamp and Pear Tart, layers with the matching solid polkadot stamp using Bamboo Leaves.  

The forth row was done using the biggest solid drop shape stamp with Bamboo Leaves Ink, then the matching stripe stamp with Dandelion.  

The rest of the stamping was done using New Sprout Ink and the biggest drop shapes.  I purposely started off with the solid drop shape and extended the pattern with matching stamps that have less and less solid area to get an illusion of fading colour although I used the same colour throughout. 

The Thank You sentiment from Stampendous was embossed using ZING embossing powder Green and Teal (yes, I mixed these two colours together to form the green I wanted for the sentiment)

The twine is from my daughter's craft stash, it seems that I can always found some treasures there for my cards!

I also popped the panel up with fun foam to give the card a little bit dimension!

Thank you for popping by and have a wonderful and creative day!


Monday, March 7, 2016

Touchy Feely Happy Easter Card


The card was very fun to make.   The bunnies were made using Memory Box's Sketch Bunny Background Craft die.  I don't have the felt with the colours I like for the bunnies, so I die cut the bunnies on a piece of white felt, then used Heidi Swapp's Color Shine to spray the colours on the bunnies.  I found that sticking the felt bunny on a piece of paper using a repositionable glue first before spraying it helped cause the ink took a very long time to dry on the felt I used, and I can hold on to the paper instead of the wet inked felt.  I used two white fuzzy balls from my 8 years old craft stuff for the bunnies' tails.

The tag was made using Mama Elephant's Framed Tags - Madison Avenue Creatice Cuts die set on a piece of pattern paper.  The "flag" was made using the die from the same die set on a piece of white cardstock.  I don't have an Easter sentiment that is small enough to go on the flag, so I wrote the sentiment myself with a Pink Uni-posca acrylic pen.

I also embossed the white background using W R Memory embossing folder.  When I was putting the card together, I decided to go for a very loose feel, so the panels are all off centred.

Heidi's Color Shine:  Butter, Mustard, Peach
                                  Blush, Raspberry, Amethyst

Hoppin' Your Day is Special!

Always want to make a card with this stamp from Stampadous and I finally got a chance to do it.


I used Momento ink to stamp the image and Copic Sketch Markers to colour the image.  I didn't have any pattern paper that goes with it so I made the plaid on a yellow cardstock with a white gel pen myself. The sentiment was stamped with Onyx Black Versafine ink.  I also outlined the circle on the kite with white gel pen.

Rabbit: W2, YR21, Y21, YR24, Y15, Y38, R17
Kite: YG03, YG13, Y15, B00, BG45, B34, 
Tail of the kite: Y15, Y38, R17, YG03